Pages

Saturday, December 3, 2011

Mexican-Style Stuffed Peppers


Told you we're liking our Mexican lately! We've also been looking for ways to make delicious dinners that cost less, and hamburger meat is probably the cheapest out there. I use red peppers in this recipe, they are a bit sweeter and seem to carry a bit more flavor and heat than green peppers. You can actually assemble these peppers ahead of time and bake them later if needed.


Mexican-Style Stuffed Peppers (Country Magazine)
6 medium red peppers
1 lb lean ground beef
1/3 cup chopped onion
1/3 cup chopped celery
2 cups cooked brown rice
1/2 - 1 cup fresh cilantro, chopped (use as much as you like - I love cilantro so I use the full cup)
1-1/4 cups salsa, divided
1 tablespoon chopped green chillies (optional)
2 teaspoons chili powder
1/2 tsp salt
1 cup shredded cheese (I like extra sharp cheddar, but others would work like Mexican blend)

Directions:
  1. Cut tops off peppers and discard; remove seeds. In large pot, cook peppers in boiling waters for 3-5 minutes. Drain and rinse in cold water; set aside.
  2. In a nonstick skillet, cook the beef, onion and celery over medium heat until meat is no longer pink; drain. Stir in the rice, 1 cup salsa, chilies, chili powder, cilantro and salt. Spoon into peppers
  3. Place peppers in a 13x9x2" baking dish coated with nonstick cooking spray. Add 1/4 cup water to dish. Cover and bake at 350 degrees for 40-45 minutes or until heated through. 
  4. Uncover; spoon remaining salsa on top of peppers and sprinkle with cheese. Bake 2-3 minutes longer or until cheese is melted. Serve.

Mama Julie's EASY Cinnamon-Sugar Rolls

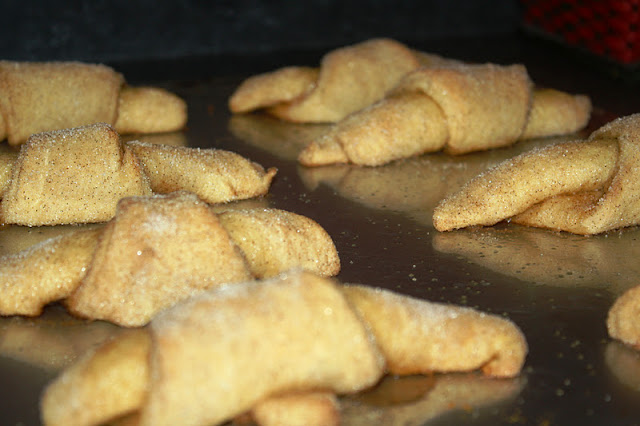
Eat these rolls for breakfast, brunch or along with dinner. They are always a hit, but people are SHOCKED when they realize how EASY they are to make. Thanks to my mom for introducing me to these yummy treats.

Mama Julie's EASY Cinnamon-Sugar Crescent Rolls
1 tube of refridgerated crescent dough (I like the reduced fat version)
Handful of sugar
Generous sprinkling of cinnamon

Directions:
  1. Preheat oven according to crescent roll directions. 
  2. Combine handful of sugar with a generous sprinkling of cinnamon in a bowl. Coat each crescent dough triangle in cinnamon-sugar mix, roll up starting with the wide end of the triangle, and place on greased (or parchment papered) tray with small end of roll tucked underneath.
  3. Serve immediately!

Homemade Taco Seasoning

We have been loving our Mexican food lately. I don't really like cooking with pre-made mixes, although easy, there is usually fake stuff in there. So, we tried a taco seasoning recipe from Allrecipes.com, and it has become our go-to for taco making.

If you like pico-de-gillo, but have never tried to make your own, it's so easy and is delicious on tacos. Just dice up a couple tomatoes and one small red onion. Then, chop about 1/2-1 cup of fresh cilantro, put it all together and squeeze half a lemon (or lime) and add a pinch of salt. Delicious! (Add a quarter of diced jalapeno pepper for heat).

Taco Seasoning (Makes enough for 2 lbs of beef)
1 tbsp chilli powder
1/4 tsp garlic powder
1/4 tsp onion powder
1/4 tsp red pepper flakes (optional - I usually don't add because of the kids)
1/4 tsp dried oregano
1/2 tsp paprika
1 1/2 tsp ground cumin
1 tsp salt
1 tsp pepper

Directions:
  1. Combine all ingredients together. Cook beef in a little bit of vegetable oil and add seasoning mix (add half if cooking 1 lb of beef, add entire mix if cooking 2 lbs of beef). Cook until beef is no longer pink.
  2. Add 1/4 - 1/2 cup of water to beef, stir, spoon into tacos and enjoy! (My favorite layering is a smear of sour cream on a crunchy taco shell, beef, cheese, homemade pico-de-gillo, and lettuce...and maybe a little hot sauce!).

Sunday, November 13, 2011

Pumpkin Spice Cupcakes

We signed up to receive a weekly bushel of veggies from a local farmer from June - October. We loved having fresh veggies every week, and it forced me to cook things that I normally don't - like pie pumpkin. These little pumpkins are meant for eating and they look just like normal pumpkins, but smaller and found in the grocery section. I decided to cook one in the oven, puree it and use as I would a can of pumpkin. I must say, the pumpkin I had didn't produce that strong of a pumpkin taste compared to the can version, but it felt good knowing it was completely homemade and fresh. And yes, you can freeze the pumpkin puree and thaw when ready to use.

All that being said, these cupcakes are DELICIOUS, especially with a lightly-spread cream cheese frosting. They are from Martha Stewart.

Pumpkin Spice Cupcakes (Martha Stewart - makes 18)
2 cups all-purpose flour
1 teaspoon baking soda
1 teaspoon baking powder
1 teaspoon coarse salt
1 teaspoon ground cinnamon
1 teaspoon ground ginger
1/2 teaspoon nutmeg
1/4 teaspoon ground allspice
1 cup packed light brown sugar
1 cup granulated sugar
1 cup (2 sticks) unsalted butter, melted and cooled
4 large eggs, lightly beaten
1 can (15 ounces) pumpkin puree

Directions:
  1. Preheat oven to 350 degrees. Line cupcake pans with paper liners; set aside. In a medium bowl, whisk together flour, baking soda, baking powder, salt, cinnamon, ginger, nutmeg and allspice; set aside.
  2. In a large bowl, whisk together brown sugar, granulated sugar, butter and eggs. Add dry ingredients, and whisk until smooth. Whisk in pumpkin puree.
  3. Divide batter evenly among liners, filling each about halfway. Bake until tops spring back when touched and a toothpick inserted in the center comes out clean, about 17 - 23 minutes, rotating pans once if needed. Transfer to a wire rack and allow to cool completely before frosting.
Betty Crocker Cream Cheese Frosting
1 package (8 ounces) cream cheese, softened
1 tablespoon milk (whole is better)
1 teaspoon vanilla
4 cups powdered sugar

Directions:
  1. Beat softened cream cheese, milk and vanilla in large bowl on low speed until smooth. Gradually beat in powdered sugar, 1 cup at a time, until smooth and of spreading consistency.
  2. Frost cupcakes with a thin layer of frosting (I tried to pipe the frosting on the cupcakes and it seemed to be too much frosting and I couldn't taste the actual cupcake). Refrigerate any remaining frosting. Frosts a 13x9" cake or fills and frosts two 8 or 9" cake layers.

Wednesday, November 9, 2011

Sweet & Tangy Apple-Cabbage Coleslaw


My love for coleslaw has grown over the years. Perhaps it's because slaw is always served with BBQ, and being from Kansas City, we would eat BBQ all the time. Some slaws are too creamy, some are just too acidic, but this recipe from America's Test Kitchen is a winner for us. The sweet apple balances out the acidity of the vinegar for a perfect combination. It's super easy if you have a food processor to slice everything thinly.

Serve With: slow cooked ribs and cheesy potatoes


Apple-Cabbage Slaw (adapted from America's Test Kitchen)
1 medium head green cabbage, cored
2 medium sized apples (Granny Smith or any variety - I like the sweeter kinds personally)
2 medium carrots
1 small onion
6 tablespoons vegetable oil
1/2 cup cider vinegar
1/2 cup sugar
1 tablespoon Dijon mustard (I prefer the seedy kind)

Directions:
  1. Thinly slice cabbage, apples, carrots and onion in food processor, or by hand, cut into thin matchsticks.
  2. Toss all vegetables together in a large bowl.
  3. Whisk together oil, cider vinegar, sugar, Dijon mustard and salt. Pour over slaw mix. You may not need the entire dressing if your cabbage was small, so add about half, toss and test. Add more if needed. (America's Test Kitchen suggests bringing oil, vinegar, sugar and mustard to a boil over medium heat and then pouring over the slaw, and allowing to cool before serving. I've found heating the dressing is not needed, but they say it helps the veggies soak the flavor up better.)

Friday, September 30, 2011

Slow Cooker Sesame Pork Ribs

"No one ever believes how little effort it takes to make these tender, juicy ribs. The meat absorbs the tangy flavor of the sweet sauce as the ribs simmer in the slow cooker." - Sandy A., in the Feb/March 2011 Country Magazine, describing her recipe for pork ribs.

As soon as I read this quote and looked at the picture of the succulent ribs, I knew I would try it out. My husband loves to slow cook ribs on the grill, but rarely has time to do so...he loved these, and I was proud to be able to serve him yummy ribs much easier than spending a couple hours outside over the grill.

Slow Cooker Sesame Pork Ribs (Country Magazine)
3/4 cup packed brown sugar
1/2 cup soy sauce
1/2 cup ketchup
1/4 cup honey
2 tablespoons white wine vinegar
3 garlic cloves, minced
1 teaspoon salt
1 teaspoon ground ginger
1/4 - 1/2 teaspoon crushed red pepper flakes (depending on how much heat you like)
1 medium onion, sliced
5 lbs. bone-in country style pork ribs (I used one rack of baby back ribs, which worked great)
2 tablespoons sesame seeds, toasted (I didn't have these, so I omitted them)

Directions:
  1. In a large bowl, combine the first nine ingredients. Add ribs and turn to coat. Place the sliced onion in crock pot (5 qt crock pot if you are using the full 5 lbs of pork ribs, a smaller crock pot will fit one rack of baby back ribs). Top with ribs and sauce.
  2. Cover and cook on low for 5-6 hours. Meat should be very tender. Place ribs on serving platter; sprinkle with sesame seeds and serve.

Thursday, September 29, 2011

Aussie Pavlova

What was my husband's one request for his birthday? A pavlova. Many Americans have no idea what this is, but it is a staple in Australia. And his aunt is a pav master, hers are legendary within family and friend circles. She's been making them for 40 years and I HAVE THE RECIPE! I'm so happy to be able to pass this one along to my girls.

The last time we visited his homeland, Aunt Helen gave me a one-on-one demonstration of how to make her delicious pavlova - which has a thick, crispy but airy meringue base, homemade whipped cream and strawberries on top.

Luke loved the pav. It was so yummy, and brought back all kinds of good memories of home for him.

TIPS:
  • Aunt Helen swears by baking this pav next to an open window. After reading reviews of other pavlova recipes, I've learned that humidity can make or break a pav. So if it's a beautiful day, open up that window!
  • Leave pavlova in the cooling oven when it's done baking. If you take it out when the timer goes off, your pav will crack!
Aunt Helen's Pavlova
8 egg whites - egg whites should be room temperature
3 cups sugar
2 teaspoons cornflour
2 teaspoons vinegar
2 teaspoons vanilla
pinch (Big!) salt

Directions:
  1. Grease your largest baking tray with butter and sprinkle an equal mixture of cornflour and powdered sugar over greased surface. Preheat oven to 300 degrees.
  2. In standing mixer, beat egg whites and pinch of salt with whisk attachment. Allow to whip right up to fluffy peaks and gradually add while whipping, the sugar bit by bit. You'll notice the mixture go glossy.
  3. Once all the sugar dissolves, turn off the mixer. Then, with a rubber spatula, gently fold in vanilla, vinegar and cornflour, stirring for 30 seconds only.
  4. Load this meringue mixture on to tray with slightly built up walled sides (a well in the center). The meringue will rise!
  5. Place in oven for 1 1/2 hours on 300 degrees, then turn oven off and leave pavlova in oven for 1 hour. Halfway through that cooling hour, barely crack oven open. After at least 1 hour cooling in the oven, take out and allow to cool right down.
  6. Spoon a generous portion of whipped cream over pavlova and top with sliced strawberries. We love homemade whipped cream: Put whisk and bowl in freezer for 5 minutes. Whisk in standing mixer 2 cups heavy cream, 3 tablespoons powdered sugar, 2 teaspoons vanilla. Other toppings for the pav include: kiwi, passionfruit, or Australian-style peppermint crisp (delicious!!). Serves 24 people.

Homemade Buttermilk Biscuits

Homemade biscuits are really quite easy. Any time I need to bake some up, I pull out my 20-year old Betty Crocker cookbook. I'm sure there are fancier biscuits out there, but for adding honey, jam and cream, or using it for this slow cooker chicken pot pie, they definitely do a good job.


Homemade Buttermilk Biscuits (Betty Crocker)
1/2 cup cold butter, cut into small squares (1 stick)
2 cups all-purpose flour
1 tablespoon sugar
2 teaspoons baking powder
1/4 teaspoon baking soda
1 teaspoon salt
3/4 cup buttermilk
3-4 tablespoons butter, for greasing pan

Directions:
  1. Heat oven to 450 degrees.
  2. Cut butter into flour, sugar, baking powder, baking soda and salt with pastry blender until mixture resembles fine crumbs. Stir in buttermilk until dough leaves side of bowl (dough will be soft and sticky).
  3. Turn dough onto lightly floured surface. Knead lightly 10 times. Roll or pat 1/2 - 3/4 inch thick. Cut with floured round cutter. 
  4. Add 3-4 tablespoons of butter to 9x13" glass dish. Place in oven and allow to melt. Once melted, take dish out and spread butter around dish. Roll each side of biscuit in butter, and place biscuits in dish.
  5. Bake until slightly golden, about 10-12 minutes. Cool for 1-2 minutes, then remove from dish and serve immediately.

My Go-To Chocolate Cake


Yum. Yum. Yum. That's all I have to say after making and eating this chocolate cake, courtesy of Allrecipes.com. I was in search of a moist, dense chocolate cake for my daughter's birthday party. This one did the trick. It paired really nicely with ice cream, and honestly, it tasted better a day after I put it together. My recommendation is to make it one day ahead of time and cover it really well. That allows all the flavors to settle.

So if you are looking for a delicious chocolate cake recipe that won't fail you...look no further! This is definitely my go-to chocolate cake recipe.

Extreme Chocolate Cake (Allrecipes)
2 cups white sugar
1 3/4 cups all-purpose flour
3/4 cup unsweetened cocoa powder
1 1/2 teaspoons baking soda
1 1/2 teaspoons baking powder
1 teaspoon salt
2 eggs
1 cup milk
1/2 cup vegetable oil
2 teaspoons vanilla extract
1 cup hot coffee (my change from boiling water - it doesn't give it a coffee flavor, but enriches the chocolate flavor)

Chocolate Buttercream Frosting
3/4 cup butter
1 1/2 cups unsweetened cocoa powder
5 1/3 cups confectioners' sugar
2/3 cup milk
1 teaspoon vanilla extract
Directions
  1. Preheat oven to 350 degrees F (175 degrees C). Grease and flour two 9 inch cake pans.
  2. Use the first set of ingredients to make the cake. In a medium bowl, stir together the sugar, flour, cocoa, baking soda, baking powder and salt. Add the eggs, milk, oil and vanilla, mix for 3 minutes with an electric mixer. Stir in the hot coffee by hand. Pour evenly into the two prepared pans. (Batter will be runny, make sure to fill pan no higher than 3/4 of the pan to allow for rising).
  3. Bake for 30 to 35 minutes in the preheated oven, until a toothpick inserted comes out clean. Cool for 10 minutes before removing from pans to cool completely.
  4. To make the frosting, use the second set of ingredients. Cream butter until light and fluffy. Stir in the cocoa and confectioners' sugar alternately with the milk and vanilla. Beat to a spreading consistency.
  5. Split the layers of cooled cake horizontally, cover the top of each layer with frosting, then stack them onto a serving plate. Frost the outside of the cake.

Friday, July 8, 2011

Chocolate Chip Cream Scones

I had never thought of using heavy cream to make scones until my friend Emily made these for us (thanks Emily!). I'm craving these about once a week, so I always have some cream in my fridge now days. It makes the scones so moist! How many times have you bit into a scone only to find it hard and dry? Maybe it's just me, but it seems to be the norm.

These are a simple breakfast treat that will impress guests...it certainly impressed me and my hubby!

Chocolate Chip Cream Scones
2 cups all-purpose flour
1/3 cup sugar
1 tablespoon baking powder (yes, a full tablespoon!)
1/2 teaspoon salt
1 1/4 cup heavy cream
3/4 cup chocolate chips (we prefer semi-sweet in this recipe)

Directions:
  1. Preheat oven to 425 degrees. Combine flour, sugar, baking powder and salt in a large bowl. Pour in cream and chocolate chips. Mix all together and knead the dough about 10-12 times.
  2. Spray a cookie sheet and pat dough out into a 10" circle, dough will be about 1 1/2 - 2" thick. Using a knife, cut dough like a pizza into triangles. Gently, and barely, separate each of the triangles with the knife. (There shouldn't be much space between each triangle, just a little so there's room for the scones to expand. If you leave too much space in between the scones, the scones will have crunchier sides. We prefer them to have soft sides, so just a little sliver of space will do.)
  3. Bake for approximately 16-18 minutes. For the yummiest scone, serve them warm. (Though they are delicious cold as well). The tops of the scones should be a light golden color.

Peanut Buster Ice Cream Cake

This ice cream cake became legendary at my old work. And that's not an exaggeration. It was so funny, I made it a few times, and it's a simple recipe...but I guess the end result is hard to forget. This is not my recipe, but it's taken from an elementary school cookbook that all the moms put together. I think what makes this cake is the homemade fudge. It's layered on top of a light sprinkle of peanuts, then the creamy vanilla ice cream, and a yummy oreo crust. The beauty of this dessert is, you can customize it however it suits your taste buds...instead of peanuts, try toffee bits, or instead of vanilla ice cream, try chocolate chip or cookie dough.

But I will give you the good ol' fashioned recipe...you do with it what you please!


Peanut Buster Ice Cream Cake 
1 lb oreo cookies
6 tablespoons butter, melted
1/2 gallon vanilla ice cream (I prefer the kind titled "homemade")
1 1/2 cup salted peanuts
2 cups powdered sugar
1 1/2 cup evaporated milk (one 13 or 14 oz. can)
2/3 cup semi-sweet chocolate chips (semi-sweet is what you should use for this fudge)
1/4 cup butter
1 teaspoon vanilla

Directions:
  1. Crush up all the oreo cookies into fine crumbs by putting them through the food processor, or putting them all in a zip lock bag and rolling over them with a rolling pin. Dump cookie crumbs in a bowl, add the melted butter and mix together well.
  2. In a 9x13" pan, press the oreo cookie mixture into the bottom of the pan creating the crust. Use the back of a spoon to press the crust down and smooth it out. Place in the freezer while you let the ice cream soften.
  3. Allow the ice cream to soften a bit (sometimes, I scoop it all into a big bowl and mash it around until it is spreadable with a spatula, but I try to avoid letting it melt). Scoop the ice cream onto the cookie crust and with a spatula, gently spread it around to form a uniform layer of ice cream. 
  4. Sprinkle peanuts on top of ice cream and place pan back in the freezer.
  5. In a medium saucepan, combine powdered sugar, evaporated milk, chocolate chips, butter and vanilla. Bring to a boil, and boil for 8 minutes, stirring constantly so the chocolate doesn't burn on the bottom of the pan. Once it's finished, the fudge should be dark and fairly thick as you take it off the heat. Pour the fudge into a bowl and allow to cool completely. (I usually allow to cool in the fridge for at least a few hours, but sometimes overnight).
  6. When fudge is cooled, use a spatula to spread it over the ice cream cake. Depending on how long the fudge has been in the fridge, you might have to let it soften a bit before spreading over the cake (to do this, I usually just take the spatula and stir until it's softened). Place cake back in the freezer and serve when needed.

Thursday, July 7, 2011

Chicken Pot Pie in Slow Cooker


Well, I sure have some catching up to do. There are many recipes in the que to post. Starting with this one. It's easy and delicious. This is not a traditional chicken pot pie, rather you spoon the chicken mixture over freshly baked biscuits. I've found this is a yummy way to serve veggies to my kids (slow cooker meals are great for babies and toddlers who need softer veggies!).

Chicken Pot Pie in Slow Cooker (adapted from Allrecipes.com)
2 cans cream of chicken soup (Healthy Request kind from Campbell's)
2 chicken bouillon cubes
1-2 garlic cloves, minced
1 teaspoon fresh thyme
1 1/2 teaspoons rosemary, crushed (I used dry rosemary, but you can certainly use fresh)
4 chicken breasts, chopped into 1" cubes, seasoned with salt, pepper, garlic powder and onion powder
1 cup celery, chopped
1 cup carrots, chopped
1 cup green beans, chopped
1/2 cup potatoes, chopped into 1/2" pieces
3/4 cup frozen peas
1/2 cup frozen corn

Directions:
  1. Put all ingredients except for the frozen peas and frozen corn into the slow cooker. Cover and cook for 3 hours on high.
  2. Add frozen peas and frozen corn, stir into chicken mixture, and cover again. Cook for another hour on high (total cooking time is 4 hours). 
  3. Meanwhile, bake some biscuits in the oven. You can use biscuits from a can, or from scratch (I use a Betty Crocker biscuit recipe that I will eventually post on here).
  4. Slice biscuits in half and spoon mixture over the top, serve and enjoy.

Monday, May 30, 2011

Double Chocolate Cookies


These are my hubby's second favorite cookie - the first being classic chocolate chip. These kind of taste like a brownie in cookie form, with creamy white chocolate chips in every bite. In my cookbook, "Yummy!" is written next to the recipe name. I think that's all you need to know. Definitely a good cookie to put into your rotation.


Double Chocolate Cookies (I OFTEN halve this recipe to make roughly 24 cookies)
1 1/4 cup unsalted butter, softened
3/4 cup brown sugar
1 1/4 cups sugar
2 eggs
1 3/4 cup all-purpose flour
1 1/4 cup cocoa powder
2 teaspoons baking soda
8 oz. white chocolate chips (Ghiradelli are my favorite)

Directions:
  1. Preheat oven to 350 degrees.
  2. In mixing bowl, mix together flour, cocoa powder and baking soda. Set aside.
  3. Using an electric mixer or hand-held beater, cream butter and sugars until light and fluffy, scraping the sides of the bowl as needed. Add eggs and continue to beat until well combined, about 1 minute.
  4. A little at a time, pour dry ingredients into wet ingredients. Mix slowly until all is combined. The batter will be very stiff.
  5. Fold in white chocolate chips with a spatula. Drop by the tablespoon onto greased or parchment paper-lined baking sheet. Bake for 8-10 minutes, allow to cool on the pan for a few minutes and move to cooling rack.

Easy Breakfast Egg Casserole


It's been a while since I've blogged. I went through a pretty tough experience, the toughest of my life, and it put blogging into perspective. The good news is, I'm feeling better. And I'm ready to blog again. Especially for my girls. I definitely want them to have this easy egg casserole recipe. It's perfect for when you have company over, and you don't want to spend the morning hovering over the frying pan making scrambled eggs. Just pop in the oven - and it's done. Boo-yah.

Easy Breakfast Egg Casserole
20-24 oz. of shredded hash browns, thawed
1 teaspooon salt
1/2 teaspoon pepper
3 cups shredded sharp cheddar cheese
1/2 cup milk
12 eggs
1/2 lb. ham, diced (you can substitute cooked bacon or turkey for the ham)

Directions:
  1. Butter a 9x13" glass baking dish and preheat the oven to 350 degrees.
  2. Spread hash browns in the dish, sprinkle on the salt and pepper. 
  3. Sprinkle 1 1/2 cups of cheese over the potatoes. Beat the eggs and milk; pour over the potatoes and cheese.
  4. Top with diced ham and remaining cheese. 
  5. Bake uncovered at 350 degrees for 45 minutes. Best eaten the day you make it.

Sunday, May 1, 2011

Sweet Asian Pork Chops


How many times have you eaten dry pork chops? I know my previous attempts have been less-than-yummy...until NOW! Thanks to a great America's Test Kitchen recipe, these are tender, moist and coated in the most delicious sweet Asian glaze. You can add a bit of heat if you want, too.

A couple tricks to remember when cooking these:
  • Start cooking the chops in a cold pan - this prevents them from drying out
  • Cut slices in the fat around the chop, about 2" apart - it'll prevent the pork from curling up
My hubby loves these, he even asked for them the other night. They are officially in our meal rotation.

Sweet & Spicy Pork Chops (slightly adapted from America's Test Kitchen)
1/3 cup apple cider (or apple juice)
2/3 cup packed dark brown sugar (make sure you have at least 1/8 cup of brown sugar for later as well)
1/4 cup cider vinegar
2 garlic cloves, minced
1 tablespoon Dijon mustard
1 teaspoon hot sauce (for more heat, add up to 1 tablespoon)
1/4 teaspoon cornstarch
3-4 bone-in rib or center cut pork chops, about 1"-1 1/2" thick
1 teaspoon vegetable oil
Salt & pepper
1/2 teaspoon granulated sugar

Directions:
  1. Whisk cider, brown sugar, vinegar, garlic, mustard, hot sauce and cornstarch in medium bowl. Pat chops dry with paper towels. Cut slits through the fat of the chops, about 2" apart (this prevents them from curling when cooking).
  2. Rub chops with oil, season with salt and pepper, and sprinkle 1 side of each chop with sugar.
  3. Place chops, sugared-side down, in large nonstick skillet. Place skillet over medium-low heat and cook until chops are lightly browned, 10-12 minutes. 
  4. Flip chops, add cider mixture, and cook, covered with a lid or with foil, until meat registers 145 degrees, or 8-10 minutes. Transfer chops to platter and tent with foil.
  5. Increase heat to medium-high and cook, uncovered, until liquid is thick and syrupy, about 5 minutes. During this time, taste the liquid and add 1/8 - 1/4 cup brown sugar if desired. (I like it sweet!)
  6. Return chops to skillet and turn to coat in glaze. Transfer chops to platter and top with remaining glaze. Serve and enjoy!

Friday, April 29, 2011

Strawberry-Lemon Yogurt Blintzes

My, oh my. What a breakfast we had this morning. Thanks to this amazingly perfect recipe from Cheeky Kitchen, one of my all-time favorite food blogs. These crepe-like blintzes are filled with a pillowy layer of whipped cream (hello richness), greek yogurt (for a slight tang), honey (cue the sweetness), and lemon zest (brings it alive). Topped with a strawberry-lemon-maple syrup.

Yep, we had a good morning. Most definitely going to make these when entertaining guests for breakfast or brunch. Or just to make a hubby happy on an ordinary Friday morning.

Strawberry-Lemon Yogurt Blintzes (Brooke McLay of Cheeky Kitchen)
FOR THE BLINTZES:
4 eggs
1 tablespoon sugar
1/2 teaspoon salt
1 cup flour
1 cup milk
1 teaspoon vanilla

FOR THE FILLING:
1 1/2 cup heavy whipping cream
1 cup plain greek yogurt
1/4 cup honey or pure maple syrup
zest of 1 lemon
1 tablespoon powdered sugar (my addition)

FOR THE FRESH STRAWBERRY SYRUP:
1 pint strawberries, sliced
Juice of 1 lemon
1/2 cup pure maple syrup

Directions:
 

1. FOR THE BLINTZES: Combine all ingredients together in a blender until smooth. Heat a nonstick cooking pan or cast-iron skillet to medium-low heat. Spray with nonstick cooking spray. Pour a 6-inch circle of batter into the hot skillet. Cook as you would a pancake, until golden brown. Flip and cook the opposite side until golden brown.  Made about 5-6 blintzes.

2. FOR THE FILLING: In an electric mixer, beat the whipping cream until light and fluffy. Add the remaining ingredients and beat until well mixed. Spoon into the center of the blintzes. Top with Fresh Strawberry Syrup & enjoy! 

3. FOR THE FRESH STRAWBERRY SYRUP:
Mix all ingredients together. Spoon over yoghurt-filled bintzes. Enjoy!

Tuesday, April 26, 2011

Aussie Anzac Biscuits


Anzac bisquits - Australian for cookies - are eaten by every Aussie. They are eaten year-round, but especially today, April 26, Anzac Day. They are filled with the rich goodness of golden syrup, oats and butter. We do not have ANYTHING like them in the states. I couldn't stop eating the batter - or the cookies.

What's better is, this is an old family recipe. It comes from my hubby's Aunt Helen. She's fun, vivacious, a stellar cook and she can see the beach from her deck (jealous). She's worked on refining this recipe for nearly her entire life, and the result is just heavenly.

So, please invest in some golden syrup, so you can make these delicious "bickies" or my hub's other favorite Aussie dessert, Caramel Slice.

Aussie Anzac Biscuits a la Aunt Hell
1 cup all-purpose flour
1 cup rolled oats
1 cup sugar
1 cup dessicated coconut
1 stick butter (NOT margarine)
1/4 cup water
2 1/2 tablespoons golden syrup
1 teaspoon baking soda (carb soda in Australia)

Directions:
  1. Preheat oven to 280 degrees.
  2. Place all dry ingredients (flour, oats, sugar, coconut) in a biggish bowl and stir them together with a well in the centre.
  3. Then place butter, water and golden syrup in a saucepan on medium heat. When this liquid mixture comes to the boil, bring it over to the bowl and stir in 1 teaspoon baking soda, and stir till all mixed in. (Should be consistency of thick custard - if it's a little dry add a little more hot water). Baking soda added to this will make it froth up and over the top of the saucepan, so hold pot over bowl while you pour and stir it in the dry ingredients.
  4. Put baking paper on trays and spoon a dessert-spoon mixture onto trays about 3 inches apart. With a wet hand flatten dollop a little. About 12 to a tray. 
  5. Place in the oven and allow to cook for 20+ minutes till they are darkish golden brown. THEY will be a little crunchy! For chewy, just allow to go golden brown in the oven.

Wednesday, April 20, 2011

Fruit Salsa with Cinnamon Sugar Tortilla Chips


It snowed today. Major bummer. My daughter said to the snowflakes, "Go away snow!" And I agreed. Then, in the spirit of the spring that is supposed to be here, I decided to make this refreshing fruit salsa. It definitely livened our afternoon. It is a perfect party appetizer and it made me dream of future days of summer BBQ's with friends.

The hubs loved this salsa, and my daughter couldn't stop eating the cinnamon sugar tortilla chips.

Thankfully, this weekend is supposed to be in the 60's. Here's to spring days that are WAY overdue!

Fruit Salsa with Cinnamon Sugar Tortilla Chips (adapted from Mary Van Driest's recipe in Cook's Country 2008)
2 tablespoons apple jelly
2 tablespoons light brown sugar
1/4 cup orange juice
1 jalepeno pepper, seeded and minced
2 Granny Smith apples, peeled, cored and chopped fine
1 pint strawberries, hulled and chopped fine
3 good size kiwis, peeled and chopped fine
juice from 1 lemon (or you can try a lime)

2 tablespoons sugar
1 tablespoon cinnamon
1/4 cup butter, melted
6 - 8" flour tortillas

Directions:
  1. In a large bowl, whisk together apple jelly, brown sugar and orange juice (whisk really good to ensure jelly breaks down).
  2. Add chopped jalepeno, apples, strawberries and kiwis to bowl. Mix together with the jelly mixture. Start squeezing the juice from one lemon into fruit salsa, taste, and add more according to taste. I used the whole lemon.
  3. For tortilla chips, adjust oven racks to upper-middle and lower-middle positions, and preheat oven to 350 degrees. Combine the cinnamon and sugar in a small bowl. Melt butter and brush over both sides of the tortillas. Cut each tortilla into 8 triangles and then place on a baking sheet. Sprinkle the cinnamon-sugar mixture generously over the tortilla triangles. Bake until golden and crisp, around 14 - 18 minutes, switching and rotating the baking sheets halfway through baking time.

Monday, April 18, 2011

Sprinkles Strawberry Cupcakes


Cupcakes had me down. They are so pretty. Maybe too pretty for their own good. The taste wasn't living up to its looks. So many of my batches were so-so. I even had a conversation with a friend that, perhaps, cupcakes are overrated.

I set out to do some research, and hopefully, prove myself wrong.

These tips really helped me, they come straight from Candace Nelson of Sprinkles Bakery.
  • Temperature is key - All ingredients should be at room temperature before you begin, otherwise, the ingredients can become lumpy when combined, which encourages overmixing (not good).
  • Don't overmix - Stir ingredients together until just combined. Overmixing leads to dense cakes, rather than light and fluffy.
  • Use the best ingredients - The quality of ingredients really does make a difference. In this recipe, use organic strawberries. Reviews reported that normal strawberries made it hard to taste their flavor.
Ok, now to the good stuff.


My final tip: find a fantastic recipe. This Sprinkles recipe won me over. The cake is light, fluffy and has a nice flavor. I added lemon zest thanks to another blogger who suggested it. The frosting? Well, it's basically like biting into a strawberry ice cream cone.

Yum.

Sprinkles Strawberry Cupcakes
2/3 cup whole fresh organic strawberries
zest of 1 lemon, grated (my addition)
1 1/2 cups all-purpose flour, sifted
1 teaspoon baking powder
1/2 teaspoon baking soda
1/4 teaspoon coarse salt
1/4 cup whole milk, room temperature
1 teaspoon pure vanilla extract
1/2 cup (1 stick) unsalted butter, room temperature (4 oz)
1 cup sugar
1 large egg, room temperature
2 large egg whites, room temperature
Sprinkles' Strawberry Frosting (below)

Directions:
   1. Preheat oven to 350 degrees. Line a 12-cup muffin tin with cupcake liners; set aside.
   2. Place strawberries in a small food processor; process until pureed. You should have about 1/3 cup of puree, add a few more strawberries if necessary or save any extra puree for frosting; set aside.
   3. In a medium bowl, whisk together flour, baking powder, baking soda and salt; set aside. In a small bowl, mix together milk, vanilla, lemon zest, and strawberry puree; set aside.
   4. In the bowl of an electric mixer fitted with the paddle attachment, cream butter on medium-high speed, until light and fluffy. Gradually add sugar and continue to beat until well combined and fluffy. Reduce the mixer speed to medium and slowly add egg and egg whites until just blended.
   5. With the mixer on low, slowly add half the flour mixture; mix until just blended. Add the milk mixture; mix until just blended. Slowly add remaining flour mixture, scraping down sides of the bowl with a spatula, as necessary, until just blended.
   6. Divide batter evenly among prepared muffin cups. Transfer muffin tin to oven and bake until tops are just dry to the touch, 17 - 19 minutes. Cool completely.

Sprinkles Strawberry Frosting (I halved this and it lightly frosted 12 cupcakes)
3/4 cup whole fresh strawberries
1 cup (2 sticks) unsalted butter, firm and slightly cold
Pinch of coarse salt
3 1/2 cups confectioners' sugar, sifted
1/2 teaspoon pure vanilla extract
zest of a whole lemon, grated (my addition)

Directions:
   1. Place strawberries in the bowl of a small food processor; process until pureed. In the bowl of an electric mixer fitted with the paddle attachment, beat together butter and salt on medium speed until light and fluffy. Reduce mixer speed and slowly add confectioners' sugar; beat until well combined. Add vanilla, lemon zest and 5-6 tablespoons strawberry puree (taste the frosting, add more or less strawberry puree according to your liking); mix until just blended. Do not overmix or frosting will incorporate too much air. Frosting consistency should be dense and creamy, like ice cream.

Sunday, April 17, 2011

Slow Cooker Root Beer Pulled Pork

So I found a better pulled pork recipe than before...and it turns out, my friend Amy of QuickFit, found the same recipe. And we made the same adaptions to the recipe, before even talking about it. And both our hubbies loved it.

I know, root beer in a pulled pork recipe sounds crazy. But, the original recipe has nearly 1,500 people on Allrecipes.com giving it 4.5 stars.

Trust us, it's good! And of course, easy. Because it's a crock-pot meal. My fav.

Root Beer Pulled Pork
1 (2 lb) pork tenderloin
1 can (12 oz.) root beer
1 medium onion, chopped finely
2 garlic cloves, chopped
Salt & pepper
Your favorite BBQ sauce (about half a bottle to full bottle, depending on how much sauce you like)
Kaiser rolls or hamburger buns

Directions:
  1. Season pork tenderloin with salt, pepper and chopped garlic. Place into slow cooker.
  2. Add chopped onions to slow cooker, and then add the root beer. 
  3. Cover and cook on high for 4-5 hours, or on low for 6-7 hours. 
  4. Drain juice from the slow cooker (keeping the onions in the cooker). With a fork, shred the pork. Add your favorite BBQ sauce, mix together and serve. (Sometimes it's easier to remove the pork and onions from the slow cooker and put into a separate bowl. Then, shred the pork, drain the juice out of the slow cooker and return the pork and onions to the cooker. Then add the BBQ sauce).

Tuesday, April 5, 2011

Mama Julie's Cheesy Potatoes


If I'm ever asked to bring a hotdish to a get-together, this is what I bring. My mom's cheesy potatoes. It is definitely a crowd-pleaser. And, it's one recipe I MUST pass on to my daughters.

We had a fun couple over last night to watch the NCAA championship game (which wasn't too entertaining - I love basketball, even played it in college, but this game looked more like open gym)...anyways, this is all that was left in my 9x13" pan.
  Needless to say, it's a hit everytime. Thanks, mom, for another good one!


Mama Julie's Cheesy Potatoes
1 normal-size bag frozen, shredded potatoes (there are usually two sizes of bags - normal and extra large, just get the normal size, forgive me, I don't know the exact pounds/ounces right now!)
1 can cream of chicken soup (Healthy Request kind from Campbell's)
1/2 - 3/4 of a 16 oz. container of light sour cream
2 cups shredded extra sharp cheddar cheese
1/4 stick butter, melted
Salt & pepper

Directions:
  1. Preheat oven to 375 degrees.
  2. Mix sour cream, soup and melted butter in your largest bowl.
  3. Dump entire bag of frozen, shredded potatoes into the large bowl. Season generously with salt and pepper.
  4. Add the cheese to the large bowl as well, and mix together until all ingredients are well combined. 
  5. Transfer cheesy potatoes to a GREASED 9x13" baking dish, and cover with foil.
  6. Bake at 375 degrees for 1 hour, 10 minutes. Remove the foil, and bake for another 5 minutes. The edges should be brown and crispy, and the middle of the potatoes should be hot and the cheese melted.

Sunday, March 27, 2011

Baby-Themed Sugar Cookie Cutouts

Tip: If you use this icing recipe, DON'T put the cookies in the refrigerator. I did, and the icing on the bears got splotchy. Instead, seal them in a plastic bag or tupperware and leave on the counter.
It's amazing these cookies made it. I had it all planned out - put the first layer of icing on the cookies during the girls' naptime, and then finish the decorations at night. But how often do plans get totally tossed up in the air when small children are involved??? These cookies are survivors.

My daughter decided it was not a nap day. Instead, she decided to destroy her room. And pee on the carpet. And eat one of the two "B" letters I had cut out to spell BABY. I couldn't believe it.

But after much perseverance (and very carefully cutting out another "B" from a baked cookie), these cookies were done. And I was pretty happy with the end result. Though next time, I will use strawberry-flavored extract for the pink icing and lemon extract for the yellow icing, then almond or vanilla extract for the other colors (this time, I used vanilla for the icing, and while they were good, I think it'd be nice to have a variety of icing flavors on the cookies).

This sugar cookie cutout recipe comes courtesy of my mother. The icing is my adaption of a few I found online. It dries shiny and hard, but is soft when bitten into. To decorate, here's a step-by-step guide on how to ice and decorate sugar cookies.

Mama Julie's Sugar Cookie Cutouts
2 1/2 cup flour
1 cup sugar
1/2 teaspoon baking powder
1/8 teaspoon salt
1 tablespoon vanilla extract
1 cup butter, softened (2 sticks)
1 egg

Directions:
  1. In mixing bowl, cream butter, egg and vanilla (won't be completely smooth). 
  2. In separate bowl, sift flour, sugar, baking powder and salt together. 
  3. Slowly mix dry ingredients into wet ingredients. Use hands if needed to knead dough into a ball. 
  4. Preheat oven to 350 degrees. Sprinkle flour on your work area and on your rolling pin. Roll dough out, sprinkling the top of the dough with flour as needed. Roll until dough is approximately 1/4" thick. Cut out shapes and place cookies on parchment paper-lined baking tray. 
  5. Bake for 8-10 minutes. Allow to sit on the tray for a few minutes and then transfer to a cooling rack. Cool completely before icing. Makes at least 2 dozen.
Sugar Cookie Icing
1 cup powdered sugar
3 teaspoons milk
2 teaspoons light corn syrup
1/4 teaspoon flavoring (vanilla extract, almond, etc.)
Food coloring

Directions
  1. In a small bowl, stir powdered sugar and milk together until smooth.
  2. With a handheld beater, beat in light corn syrup and flavoring.
  3. Divide into bowls and add appropriate food coloring. To ice cookies like a pro, create an outline on each cookie with thicker icing. Then, thin the icing with a little milk and spoon icing into the un-iced area, spreading icing with a toothpick until the cookie is filled in. Use this step-by-step How To Decorate Sugar Cookies guide. Allow icing to set completely before adding another decorative layer of icing. If adding sprinkles, add immediately after icing. Store cookies in sealed container on the counter.

Thursday, March 24, 2011

Ghiradelli Chocolate Chip Cookies


I love Ghiradelli chocolate. In fact, my daughter and I have been known to eat it by the bagful (plus, it's her "special treat" for going potty on the toilet). I love Ghiradelli's brownie recipe, and I've been making their chocolate chip cookies forever. They are just perfect.

There is nothing like warm, from-scratch chocolate chip cookies straight from the oven. With a tall, cold glass of milk, please!


If I'm just baking these for my hubby, I bake as many as he wants, then I roll the remaining batter into little balls, put them into a bowl, and place in the freezer for another night. I've also halved this recipe.


Ghiradelli Chocolate Chip Cookies (4 dozen)
2 1/4 cups unsifted flour
1 teaspoon baking soda
1/2 teaspoon salt
1 cup (2 sticks) unsalted butter, softened
3/4 cup sugar
3/4 cup brown sugar, packed
2 teaspoons vanilla extract
2 eggs
2 cups Ghiradelli semi-sweet chocolate chips
Optional: 1 cup chopped walnuts or pecans

Directions
  1. Preheat oven to 375 degrees. Stir flour with baking soda and salt; set aside. 
  2. Beat butter with sugar and brown sugar at medium speed until creamy.
  3. Add vanilla and eggs, one at a time, mixing on low speed until incorporated.
  4. Gradually blend dry mixture into creamed mixture.
  5. Stir in chocolate chips and nuts (if desired). 
  6. Drop by tablespoon onto cookie sheets. Bake for 9-11 minutes or until golden brown.

Monday, March 21, 2011

Quick Dinner: Ginger-Teriyaki Stir Fry


Got leftover meat? How about some veggies about to go bad in the fridge? Then try this quick and yummy stir fry. You can use frozen veggies of course, but the slight crunch of fresh veggies is really nice in a stir-fry.

This dish is so flexible...noodles or rice work, as does chicken or steak. Kudos for the sauce recipe goes to America's Test Kitchen.


Ginger-Teriyaki Stir Fry
Pad thai quick noodles or rice
2 tablespoons vegetable or canola oil
Fresh or frozen vegetables, chopped into bite-size pieces, such as:
  • broccoli
  • carrots, cut in julienne style (match-stick)
  • mushrooms
  • sugar snap peas
  • water chestnuts
  • asparagus
Chicken or steak, cooked, and cut into bite-sized pieces (2-3 chicken breasts/steaks)

Ginger-Teriyaki Sauce:
1/2 cup soy sauce
1/2 cup sugar
3 garlic cloves, minced or pressed
1 tablespoon grated fresh ginger (or 1 teaspoon dry ginger)
2 tablespoons cider vinegar
2 teaspoons cornstarch
red pepper flakes

Directions (serves 4)
  1. Whisk soy sauce, sugar, garlic, ginger, vinegar and cornstarch in bowl, and set aside.
  2. Put vegetable or canola oil in wok or large nonstick pan, and bring up to medium heat. Add vegetables and cook until slightly softened.
  3. Meanwhile, cook pad thai noodles or rice according to box directions.
  4. Pour soy sauce mixture into vegetable pan.  Simmer over medium heat until sauce thickens, about 2 minutes. Add cooked chicken/steak bits into pan, stir, and cook for another minute or so, until meat is warmed.
  5. Add noodles or rice to stir-fry, and mix together. Sprinkle desired amount of red pepper flakes on top. Serve and enjoy!

Friday, March 18, 2011

Applesauce Muffins with Streusel Topping


I woke up this morning and felt like baking. And eating. Something baked.

With a toddler and baby running (and crawling) around, and somewhere to be at 9:30 a.m., I was able to whip these muffins together, they are that easy...and they definitely hit the spot. Give me anything with a streusel topping, seriously. I love it.


These are chock-full of oatmeal, raisins, applesauce and some brown sugar. So they are semi-healthy, slightly sweet, definitely moist, and oh so yummy!

Applesauce Muffins
1/2 cup butter (1 stick), softened
3/4 cup packed light brown sugar
1 egg
1 cup flour
1/2 teaspoon cinnamon
1/4 teaspoon nutmeg
1 teaspoon baking powder
1/4 teaspoon baking soda
dash of salt
3/4 cup applesauce
1/2 cup raisins
1 cup quick cooking rolled oats

Directions
  1. Preheat oven to 350 degrees. Line muffin tin with liners.
  2. Cream the butter and brown sugar until light and fluffy. Add the egg and beat well. 
  3. Add flour, cinnamon, nutmeg, baking powder, baking soda, salt, and mix well.
  4. Add applesauce and mix well; stir in raisins and oatmeal.
  5. Spoon into 12 lined muffin cups. Sprinkle the following streusel topping onto each batter-filled cup. Bake at 350 degrees for approximately 25 minutes. Test for doneness with a toothpick, and cool on a rack.
Streusel Topping
1/2 cup quick cooking rolled oats
1/2 cup brown sugar
1/4 cup flour
1/4 cup cold butter (cut into tablespoons)
dash of cinnamon

Wednesday, March 16, 2011

Mushroom & Lemon Couscous


Couscous makes a great sidedish to chicken, fish or steak. It is so easy to prepare - just 10 minutes and it's done. This recipe takes ordinary couscous and yummies it up with the flavors of garlic, mushrooms, lemon, onion and Parmesan cheese. Enjoy!


Mushroom & Lemon Couscous
2 tablespoons butter
1/2 cup green onions, sliced
1 cup mushrooms, sliced (baby portabellas are yummy!)
1 clove garlic, pressed
1 package NEAR EAST Couscous Wild Mushroom & Herb
1 can (or 14.5 oz.) chicken stock
2 tablespoons lemon juice
1/4 cup Parmesan cheese

Directions
  1. In large nonstick pan or skillet, melt butter over medium heat. Add green onions, mushrooms and garlic. Saute for 3-5 minutes or until tender.
  2. Meanwhile, in medium saucepan, prepare couscous according to package directions, except use chicken broth instead of water and add lemon juice with contents of spice sack. 
  3. Combine prepared couscous into the mushroom mixture, and stir in Parmesan cheese.

Monday, March 14, 2011

Easy Weekend Blueberry Pancakes


We love pancakes on the weekend. I have tried more elaborate pancake recipes, like Bobby Flay's delicious Lemon-Blueberry-Ricotta Pancakes, but when I have a hungry hubby and kiddos waiting to be fed, I opt for this simple recipe (adapted from a Betty Crocker cookbook).

You can use store-bought syrup, but have you ever looked at the ingredients? Most are made of high fructose corn syrup! Try real maple syrup with some butter in it...that simple recipe is below as well. It'll make a HUGE difference. You'll never go back to the corn syrup-based stuff again!

Easy Weekend Blueberry Pancakes
1 egg
3/4 cup milk
1/2 teaspoon vanilla extract
2 tablespoons unsalted butter (melted) or oil
1 cup flour
1 tablespoon sugar
3 teaspoons baking powder
1/2 teaspoon salt
1 teaspoon lemon zest (or orange zest if lemon isn't available)
fresh or frozen blueberries

Maple-Butter Syrup:
1/2 cup pure maple syrup
4 tablespoons unsalted butter

Directions
  1. Beat egg in a medium bowl on high speed until fluffy. (A handheld beater works best for 1 egg.)
  2. Beat in remaining ingredients just until smooth.
  3. Grease griddle with butter and drop pancake batter by 1/4 cup. Sprinkle blueberries in freshly dropped pancakes and cook until puffed and dry around the edges. Turn and cook the other side until golden brown.
  4. To make syrup, put maple syrup in a saucepan and warm over medium-low heat. When warm, add in butter and stir to combine. Taste, and add more butter if you prefer. Serve with pancakes.

Sunday, March 13, 2011

Aussie Caramel Slice


I have been to Australia twice (thanks to my Aussie-hubby). And both times I couldn't get enough of this decadent little dessert. In the words of my mother-in-law who saw me baking this dessert tonight (over Skype)..."You do know the way to a man's heart!"

Australia is one cool country. If you haven't ever been, you really should go. Besides experiencing the fun Aussie culture, super-friendly people, and the beautiful beaches...the quaint, locally-owned bakeries are definitely worth exploring.

There are no chain-bakeries or restaurants down under (except for a few fast-foodies like McDonald's). Only local.

And, though I tasted many an Aussie dessert and pastry, the Caramel Slice always won. It's simple: shortbread-like crust, thick caramel filling, and dark chocolate topping.

This recipe comes from "The Essential Baking Cookbook." And it's pretty much perfect.


Aussie Caramel Slice
Crust:
1 cup self-raising flour
1 cup desiccated coconut
1/2 cup sugar
9 tablespoons unsalted butter, melted

Caramel Filling:
14 oz. can sweetened condensed milk
1 1/2 tablespoons unsalted butter
2 tablespoons Golden Syrup

Chocolate Topping:
5 oz. dark chocolate, chopped
1 1/2 tablespoons butter (original recipe calls for 20 g or 3/4 oz. white veggie shortening)

Directions
  1. Preheat the oven to 350 degrees. Lightly grease a 7x11" baking pan (I use a little smaller pan) with butter and then line with baking paper, leaving the paper hanging over on the two long sides.
  2. Sift the flour into a bowl, then mix in the coconut and sugar. Add the melted butter and stir through thoroughly. Press firmly into the baking pan and bake for 12-15 minutes, or until lightly colored. (Because I use a smaller pan, it takes about 20-22 minutes to cook, as the base is a little thicker). Allow to cool.
  3. For the caramel filling, place all the ingredients into a small pot over low heat. Slowly bring to a gentle boil, stirring constantly (so the caramel sauce doesn't caramelize on the bottom of the pot and leave you with brown burnt bits floating in the caramel). Gently boil and stir constantly for 4-5 minutes, or until lightly caramelized. Quickly pour over the cooled base, spreading evenly. Bake for 10 minutes, then set aside to cool.
  4. For the chocolate topping, place the dark chocolate and butter in a heatproof bowl. Half fill a pot with water and bring to a boil. Remove from heat and place the bowl with the chocolate over the pot, making sure the boiling water doesn't touch the bowl. Stir occasionally until the chocolate and butter have melted. Spread over the caramel. Refrigerate for 20 minutes, or until set. (Usually takes more than 20 minutes to set).
  5. Lift the slice from the pan onto a cutting board. Cut into pieces with a hot, dry knife.

Thursday, March 10, 2011

Classic Chicken Cordon Bleu


I have two splurges in life right now.

No...it's not shopping sprees, not trips to the salon, and definitely not traveling to far-off places. (Don't get me wrong, these would be fantastic...they just aren't budget-friendly).

My two splurges are simple: tasty food and working out. Guess it's for the best that they go hand-in-hand...cooking good food isn't always the healthiest option!

This recipe calls for Gruyere cheese and Panko bread crumbs. The Gruyere gives the cordon bleu an unmatched creaminess, and the Panko crumbs create an extra crispy outside.

My good friend Heidi of Internecipes, inspired me to cook chicken cordon bleu, as we had some delicious cordon bleu at her house a few weeks ago.  I found this recipe online, and it got great reviews. I did make some substitutions to the original recipe by Tyler Florence.

This yummy chicken cordon bleu has officially joined our "splurge" list. (But I will have to make a special trip to the gym tonight. The cheese and bread crumbs are definitely not low-cal!)

Chicken Cordon Bleu (Tyler Florence)
4 chicken breasts, boneless and skinless
4 slices ham
1/2 pound Gruyere cheese, grated
1/4 cup all-purpose flour
Kosher salt & freshly ground black pepper
1 cup Panko bread crumbs (found in the Asian section of your grocery store)
4 sprigs fresh thyme, leaves only
1 clove garlic, peeled and finely minced
2 tablespoons unsalted butter, melted
2 eggs
extra-virgin olive oil

Directions
  1. Preheat the oven to 350 degrees.
  2. Lay the chicken breast between 2 pieces of plastic wrap. Using the flat side of a meat mallet (or a rolling pin), gently pound the chicken to 1/4-inch thickness. Remove the top sheet of plastic and lay 1 slice of ham neatly over the top to cover the breast and sprinkle a quarter of the cheese over the ham. Tuck in the sides of the breast and roll up tight like a jellyroll inside the plastic wrap. Squeeze the log gently to seal and twist both ends tight to form a nice log. Repeat with remaining chicken. (This part became a little difficult for me, so I ended up rolling each like a log, tucking the ends under, and using a toothpick to secure).
  3. Put the flour in a bowl and season with salt and pepper.
  4. Mix the bread crumbs with thyme, garlic, kosher salt, pepper and melted butter. The butter will help the crust brown. Beat together the eggs and season, so the flour, eggs and the crumbs are all seasoned.
  5. Set up your dipping station: 1) flour bowl 2) egg mixture 3) bread crumbs 4) greased baking pan. Remove any plastic wrap from the chicken roulades, and lightly dip the chicken in the flour, dip in the egg mixture, and gently coat with bread crumbs.
  6. Put chicken roulades into the greased baking pan.
  7. Bake for 20-25 minutes until browned and cooked through. (My chicken needed about 40 minutes - they were pretty big chicken breasts and I probably didn't flatten them as much as I should have).

Tuesday, March 8, 2011

Pan-Seared Steak with Sauteed Mushrooms & Onions


My husband had waited long enough. It was due time for steak night. We used to eat steak once a week, but decided we both needed to eat a little healthier...so we cut back for a while. Needless to say, he was really excited last night!

This is a simple topping for a pan-seared steak, but it seems to take it to the next level. For an extra special treat, I cooked my hubby's fav steak - ribeye - and for me, a tenderloin.

Pan-Seared Steak with Sauteed Mushrooms & Onions
steaks of your choice (ribeye, tenderloin, sirloin, etc.)
3 tablespoons butter
salt & pepper
onion powder
garlic powder
2 tablespoons olive oil
5 oz. pack of mushrooms (baby portabellas are delicious, but any mushy will do)
1 medium yellow onion, chopped (you could also use shallots)
1/2 teaspoon balsamic vinegar
1/2 teaspoon Worcestershire sauce

Directions
  1. Season steaks with salt, pepper, onion powder and garlic powder.
  2. Put butter in nonstick pan and heat to medium-high. Add steaks to pan and once there's a nice sear, turn down the heat to medium (so you don't burn the bottom of the steak). Cook to your preferred doneness (roughly 3-4 minutes per side, depending on how thick the steak is), turn up the heat again and sear the other side. Then, bring the heat down and let the steak finish cooking.
  3. Remove steaks and tent with foil.
  4. At the same time, add 2 tablespoons olive oil to another nonstick pan or skillet, bring to medium heat. Add mushrooms and onions, and season lightly with salt and pepper. Saute for 2-3 minutes, until onions begin to get translucent. Add 2 tablespoons butter and continue sauteing for another 5 minutes. 
  5. Add balsamic vinegar and Worcestershire sauce and stir. Season lightly with more salt. Taste, and add more of the vinegar or Worcestershire, if needed. Continue cooking until onions are translucent and mushrooms are soft.
  6. Serve steaks with sauteed mushrooms and onions on top.

Monday, March 7, 2011

Best Banana Chocolate Chip Bread Ever


If you've had a baby recently (where I live) or come over to my house, you have most likely tasted this banana bread. It is my mom's recipe, and though I am very biased, I do think it's THE best banana-chocolate chip bread...EVER!

The bread is so moist, with a deep, rich banana flavor...and then there are the melt-in-your-mouth chocolate chips studded throughout, oh my!


I'm counting down...65 more minutes until that beautiful loaf comes out of the oven. And I'll most likely eat half the loaf - I'm not kidding - before my hubby gets home.


Enjoy!

Mama Julie's Banana Chocolate Chip Bread
1 1/4 cup all purpose flour
1 cup sugar
1 teaspoon baking soda
1/2 teaspoon salt
1/2 cup unsalted butter, softened (1 stick)
3 very ripe bananas
2 eggs
1/2 teaspoon vanilla extract
3/4 cup semi-sweet chocolate chips

Directions
  1. Preheat oven to 350 degrees. Lightly grease loaf pan.
  2. In a medium-sized bowl, sift the dry ingredients together (flour, sugar, baking soda, salt).
  3. In a mixing bowl, mix the butter, bananas, eggs and vanilla together on medium speed. You will see little chunks of the softened butter in the batter, and that's OK. 
  4. A little at a time, pour the dry ingredients into the wet ingredients, mixing as you go and scraping the sides of the bowl.
  5. Once combined, fold in the chocolate chips.
  6. Pour batter into greased loaf pan and bake for 55 - 65 minutes, until a toothpick comes out of the center clean, and the edges of the loaf start to pull away from the pan. (Mine seem to take about an hour to bake).
  7. Once out of the oven, spread 1/2 tablespoon of butter over the top of the hot loaf. Makes 1 loaf or 2 mini loaves. Eat with a big, cold glass of milk!

Friday, March 4, 2011

Creamy Gnocchi


If you haven't ever had gnocchi, you are seriously missing out. Soft, puffy pasta dumplings that seem to melt in your mouth. If you are a texture-person, you will love this recipe. This is my husband's favorite pasta sauce right now. It's very similar to the mushroom-pancetta pasta, but we altered it based on what we had in the house.

Creamy Gnocchi
1 package potato gnocchi
1 tablespoon butter
1 tablespoon extra virgin olive oil
1/3 cup shallots, chopped
3 cloves garlic, chopped
5 oz. sliced mushrooms, rinsed and dried (or 1 small pack)
4 strips of uncooked bacon, chopped
1/4 cup white wine
1 cup heavy cream
salt & pepper, to taste
freshly grated parmesan cheese, to serve
1 tablespoon parsley, chopped (optional)

Directions
1. Put butter and olive oil in a large nonstick pan, and heat over medium heat. Add shallots, garlic and mushrooms, and cook, stirring frequently, until softened.
2. Add the bacon to the pan and cook for another 3-4 minutes.
3. Add the white wine and cook until the alcohol has cooked off, about 1-2 minutes.
4. Pour in the heavy cream. Stir well and bring down to medium low heat. Cook gently for another 8 minutes, until the sauce has thickened.
5. Meanwhile, bring salted water to a boil and cook gnocchi according to box directions. (Usually gnocchi only takes 2-3 minutes to cook). Drain and put the gnocchi into the sauce pan and combine well.
6. Season with salt and pepper, to taste.
7. Sprinkle with fresh parmesan cheese and parsley, and enjoy!

Thursday, March 3, 2011

Simple Chocolate Frosting

This chocolate frosting is really, really easy...but very, very good. If you are a seasoned baker, you'll look at this recipe and think, "Why did she post such a simple recipe?" Well, I just find there are so many recipes out there for frosting, it can be overwhelming choosing one.

Here's one I used on cupcakes today, and the frosting was definitely the highlight. I bet it would work on top of a yellow cake, or even on sugar cookies. This frosts 12 cupcakes.


Simple Chocolate Frosting (America's Test Kitchen)
8 oz. semi-sweet chocolate chips
1 cup heavy whipping cream

Directions
1. Bring cream to a simmer in a pot.
2. Place chocolate in a medium-size bowl, pour hot cream over chocolate and cover with foil for 5 minutes.
3. Whisk chocolate and cream together until smooth, cover with plastic wrap and cool in refridgerator for 45 minutes - 1 hour.
4. Spoon chocolate into standing mixer bowl and whip on medium speed for about 2 minutes, until chocolate forms soft peaks. Spread or pipe chocolate on top of cupcakes, cake or cookies.

Monday, February 28, 2011

Ghiradelli Award Winning Brownies

I was in need of a solid, from-scratch brownie recipe. The requirements? Quick to whip up, rich in chocolate flavor, and fudgey with a crisp top.

This recipe goes above and beyond in each area.

Guess where I found it? On the back of the Ghiradelli Sweet Ground Chocolate & Cocoa canister! Who knew?! So far, Ghiradelli recipes have come through big time for me. My favorite chocolate chip cookies are on the back of the semi-sweet chocolate chips bag.

I must admit, these brownies are so chocolatey-rich, you should eat them with ice cream. A little hot fudge doesn't hurt either. 

Ghiradelli Award Winning Brownies
2 eggs
3/4 cup sugar
1 teaspoon vanilla
1/2 cup butter (1 stick), melted
3/4 cup Ghiradelli Sweet Ground Chocolate & Cocoa
2/3 cup unsifted flour
1/4 teaspoon baking powder
1/4 teaspoon salt
1 cup 60% Ghiradelli Coaco Bittersweet Chocolate Chips
1/2 cup walnuts, chopped (optional - I did not add these)

Directions
1. Preheat oven to 350 degrees. Using a spoon, stir eggs with sugar and vanilla; add butter.
2. Sift Sweet Ground Chocolate with flour, baking powder and salt (I did not sift and it came out great). Stir into egg mixture.
3. Stir in chocolate chips and nuts.
4. Spread into a greased 8" square pan. Bake 25-30 minutes.

Thursday, February 24, 2011

Peanut Butter Chocolate Cupcakes

This is pure deliciousness. The peanut butter frosting is the best I've ever tasted. Think peanut butter-chocolate pie, or peanut butter ice cream...yum! Thank you to my friend Lauren from Kansas City to opening my eyes (and mouth...and heart!) to this recipe. Happy baking!

Peanut Butter Chocolate Cupcakes (Ina Garten)
12 tablespoons unsalted butter, at room temperature
2/3 cup granulated sugar
2/3 cup light brown sugar, packed
2 extra large eggs, at room temp
2 teaspoons vanilla
1 cup buttermilk, shaken, at room temp
1/2 cup sour cream, at room temp
2 tablespoons brewed coffee
1 3/4 cups all-purpose flour
1 cup good cocoa powder
1 1/2 teaspoons baking soda
1/2 teaspoon kosher salt
large handful of semi-sweet chocolate chips (Lauren's addition)
Kathleen's Peant Butter Icing to follow

Directions
1. Preheat oven to 350 degrees. Line cupcake pans with paper liners.
2. In the bowl of an electric mixer fitted with a paddle attachment, cream the butter and 2 sugars on high speed until light and fluffy, approximately 5 minutes.
3. Lower the speed to medium, add the eggs 1 at a time, then add the vanilla and mix well.
4. In a separate bowl, whisk together the buttermilk, sour cream, and coffee.
5. In another bowl, sift together the flour, cocoa, baking soda, and salt.
6. On low speed, add the buttermilk mixture and the flour mixture alternately in thirds to the mixer bowl, beginning with the buttermilk mixture and ending with the flour mixture. Mix only until blended. Fold the batter with a rubber spatula to be sure it's completely blended.
7. Add in the chocolate chips.
8. Divide the batter among the cupcake pans (1 rounded standard ice cream scoop per cup is the right amount). Bake in the middle of the oven for 15-20 minutes, until a toothpick comes out clean (be careful to not overbake). Cool for 10 minutes, remove from the pans, and allow to cool completely before frosting. If baking mini cupcakes, reduce cooking time to approximately 10-13 minutes.

Frost each cupcake with Peanut Butter Icing and drizzle with chocolate sauce.

Kathleen's Peanut Butter Icing:


  • 1 cup confectioners' sugar
  • 1 cup creamy peanut butter
  • 5 tablespoons unsalted butter, at room temperature
  • 3/4 teaspoon pure vanilla extract
  • 1/4 teaspoon kosher salt
  • 1/3 cup heavy cream
Place the confectioners' sugar, peanut butter, butter, vanilla, and salt in the bowl of an electric mixer fitted with a paddle attachment. Mix on medium-low speed until creamy, scraping down the bowl with a rubber spatula as you work. Add the cream and beat on high speed until the mixture is light and smooth.